July 2018
Into to Shaders
Recently I became interested in graphics programming, specifically shaders. A lot of tutorials are very high-level and don't try to teach you what's happening under the hood. I wanted to understand things happening under the hood. Below is my annotation for a set of openGL tutorials.
1 — Choose your language, platform. I chose openGL, specifically PyOpenGL. openGL is an open standard maintained by many companies through Khronos. It's very flexible and runs on basically every system. Other choices would be DirectX 12 (the closed source microsoft windows graphics library) and Vulkan, a more powerful but lower-level successor to openGL (open source, made by Khronos group).
2 — Run through starter tutorials. A tutorial series "Introduction to Shaders (Lighting)" on the pyopengl website gives good practice. I didn't understand everything at first but could start understanding concepts after forcing myself through a few tutorials. My process was to code up 2–3 tutorials without trying too hard to understand what I was doing. Then go back the next day and try to understand every line of code by typing out summaries at the top of each script
3 — Guidelines for these tutorials The tutorials don't work well with python 3 (you can't install OpenGLContext). So you need to set up an environment with python 2 and then install openGL stuff in that environment:
The following are my takeaways from each tutorial. Keep in mind that these are not intended to substitute for the tutorials but rather fill in information I thought was missing or needed clarification; they are intended to be done alongside the original tutorials.
Tutorial 1
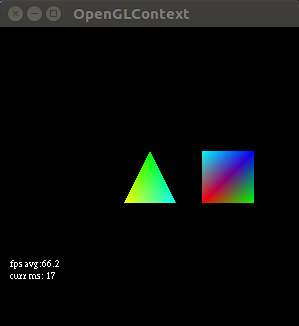
The point of this tutorial is to get started. You need two shaders, a vertex shader, and a fragment shader. The vertex shaders process each point/vertex that you pass in and return position values for that point. The fragment shader returns colors for all the pixels that are bounded by three vertices. In other words, it connects three vertices and returns colors for all the points in between them. With openGL we define vertices and then build all the objects we want to draw on the screen using triangles. A vbo is an array that holds data that will go to your GPU. In openGL you define an array locally with numpy, and then you bind it into the gpu, and then you use pointers likeglVertexPointerfto point at the data in your vbo. When you call the draw method, it looks for the vertex pointers you have created, reads the points in order, and draws them in batches of 3 as triangles on your screen. Here we draw a simple set of triangles and color them green.
Tutorial 2
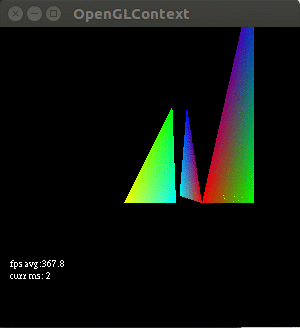
This tutorial aims to expand on the previous one by adding more colors to the fragment. To do this, we will set a vertex color in our vertex shader and then pass this value into the fragment shader. The fragment shader automatically looks at the colors in each vertex it gets for a fragment (each fragment should get three vertices because we draw triangles on the screen) and blends them for the fragment it is returning. This funky behavior is called interpolation, and I think openGL uses Goraud Shading by default to do it. The varying type values allow users to set values in the vertex shader and then access interpolation in the fragment shader. In other words, anything you set as varying in the vertex shader will be interpolated by default in the fragment shader. I want to emphasize how weird this is because it confused me at first. The best way to think about the fragment shader seems to be to envision that is receives points from the vertex shader in batches of N (N=3, points of a triangle here) and then takes each point that is in between the batch of 3 (so every point inside the triangle) and runs it through your fragment shader on that point, determining which color blend of the original three it should use for that point. The fragment shader is called a lot, so it is important that it be efficient. The vertex shader is only called, say, nine times (since we have three fragments, three times per fragment), and so we'd instead put computation in the vertex shader and let openGL work its interpolation magic. If successful, it should look like this:
Tutorial 3
The point of this tutorial is to introduce uniform values. Like varying values, it can share information between the vertex and fragment shaders, but uniform values don't get interpolated. Uniform values do not change for a whole rendering pass; they may change on the next rendering pass. So in this tutorial, we set up a uniform fog value, and based on the distance you are viewing, the triangles from the fog get thicker (further away) or thinner (if you are very close). Importantly I have changed my fog to be black, instead of white like the original tutorial, to match my black openglcontext background.
Tutorial 4
The point of this tutorial is to introduce attribute values. Here we learn that the glVertexPointerandglColorPointerare legacy opengl. Instead, in modern opengl we useglVertexAttribPointerwhich can point to arbitrary data. In this tutorial, we create an animation where every animation frame calls a function named OnTimerFraction. We set a fraction (called the tween) inside this function that tells us the proportion to combine 2 points. We then use the mix function in our shader to find a point between the point and a secondary position. If you do it correctly, it will look like this, finding some intermediary point for every frame of the animation between two stated positions:
Tutorial 5
The point of this tutorial is to start examining lighting (an entire graphics subfield in itself). This tutorial will create an object in space and then apply ambient and diffuse lighting to the object. Ambient lighting is light that the object emits if there are no other lights, this is like the base color or shape from your current viewpoint. Diffuse lighting is light that the object emits evenly in all directions from where a light ray hits it. For example, things that have a high diffuse reflectance would be objects with a matte finish.
The ambient light is just a multiplication of two constant values, the Light_ambient value (the amount of ambient light in our virtual environment) and the Material_ambient value (a value representing the material's sensitivity to reflect ambient light).
In this tutorial, we also introduce the concept of phong shading (for diffuse light). This shading method takes the position of a light vector and the normal for the fragment we are trying to shade and calculates the dot product, dot(normal_vector, light_vector). The result is used as a weight to multiply the diffuse light value. The dot product calculates the component of the original light ray that lies along normal, in other words, how much light the normal/this vertex should reflect. We do all this in the vertex shader (using a Vertex_normal that we pass in for each vertex), add all these light values into the color (a varying value), then interpolate the results fragment shader.
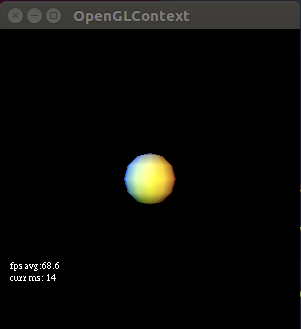
Tutorial 6
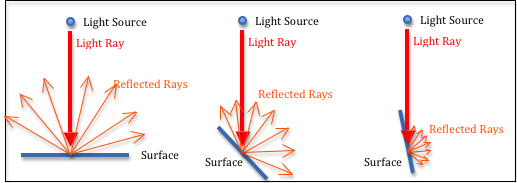
This tutorial introduces several new concepts. First, we define a set of points; the order in which we use them is just a list of numbers (index into the set of points) that tells us which point to use. We use the Sphere function from scenegraph.basenodes to generate the vertices and the index into those vertices. The benefit of this is we can store only the information we need and avoid storing redundant vertices (when you get more complex structures with lots of repeated vertex to use, the performance is a lot better). We also use blinn-phong shading, a simplified version of phong shading, for specular light reflections. Blinn shading takes a half-light vector, a vector that points out at an angle that is one-half the angle between the light source and our viewpoint. The reason for doing this is because for specular light, we need to take the dot product of the reflected light vector and the view vector. Often though, the angle between our view and our reflected light is bigger than 90 degrees. The phong caculation (dot product, cos(x>90)) is difficult to work with (negative values). So blinn figured out that taking the dot product between the half-light vector and the normal vector works and returns a viable weight (amount of reflection) for specular light. Imagine you are moving along a wireframe pixel by pixel, calculating which light values each pixel should reflect. In tutorial six, this is the case as our phong calculation is in the fragment shader, which means it's run for every pixel in the fragment. If you have to take the dot product between the reflected specular light (changes for every pixel) and the angle of view (doesn't change), this will change for every pixel. This is because every pixel reflects some different vector. The half-light vector between your view (which doesn't change) and the light source (whose vector doesn't change) is a constant. So using the blinn model is cheaper computationally for specular lighting. This photo demonstrates ambient + diffuse + specular lighting using blinn-phong shading very well:
This photo demonstrates ambient + diffuse + specular lighting using blinn-phong shading very well:

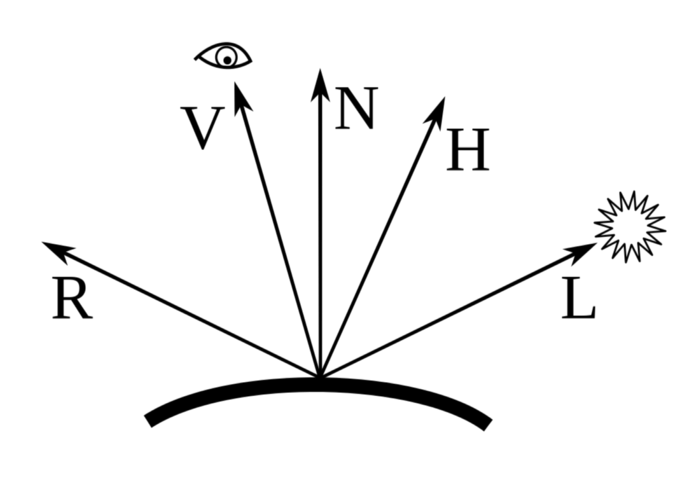
How to think about light rays, reflections, normals, and our viewpoint.
V is the view vector that represents our viewpoint. N is the normal vector that is predefined, and that points out of this fragment. L is the ray from the light source. R is the specular reflected ray from the light source. H is the 'half light vector' for calculating blinn shading (vector between V and L). Something you will notice about all these vectors is that: 1-they point outward, 2-they all originate at a single point, 3-the vectors have the same length. All the vectors point outwards to make calculating dot products easier (counter-intuitive for V and L). All the vectors originate at a single point or vertex, that is how our data is defined, and it makes it possible to calculate light in the vertex shader. We call normalize on the vectors before doing dot products. This gets our vectors in the same length. We do this because we only care about the directions of the light and viewpoint for calculating the weightings in these exercises, not the magnitude.
Tutorial 7
This tutorial aims to do a little code cleanup and show an example using multiple lights. One thing we did was move material properties (i.e. ambient material, diffuse, specular reflectance values) into a structure instead of just setting them as global uniform values. We also set up 3 lights; for each light, we provide ambient, diffuse, specular, and position vectors, each with size 4. We show how to store these lights and their component vectors in a special array and populate this array with glUniform4fv. If you do tutorial 7 correctly, you should get:
If you enjoyed this post, be sure to signup for more.